ezy way")
First thing’s first. I’m definitely not a butcher, so please refrain from comments telling me that I’m doing it wrong, or that it’s not neat enough etc. etc. etc… There likely is a more professional way to bone a chicken, but this is how I like to roll.
As a self-taught cook, I learn how to do things by reading books, other people and YouTube videos. Then armed with all that third party knowledge, I work out how to do things my way… The easy Breezy way.
Anyhoo, this is my step-by-step method for boning a chicken… And, if you want me to show you in person, why don’t you just go ahead and book a class 🙂
STEP ONE: Buy a good quality Free-range chook from your favourite butcher. Get yourself a huge 2 kilo plus bad boy, not some tiny little prepubescent juvenile.
Invest in a super sharp boning knife. If you don’t have a boning knife, a paring knife will work too. You want a knife that cuts like a razor, and fits nicely and firmly into your hand so you have good control over it. This is not a time for clunky chefs knives, you’ll end up destroying the chicken and putting holes all over the skin.

STEP TWO: Cut the wings off your chook. You want to cut them at the second joint. Once you’ve made an incision, you can use your hands to snap the wing joint and then neatly cut away the skin to remove the tip.

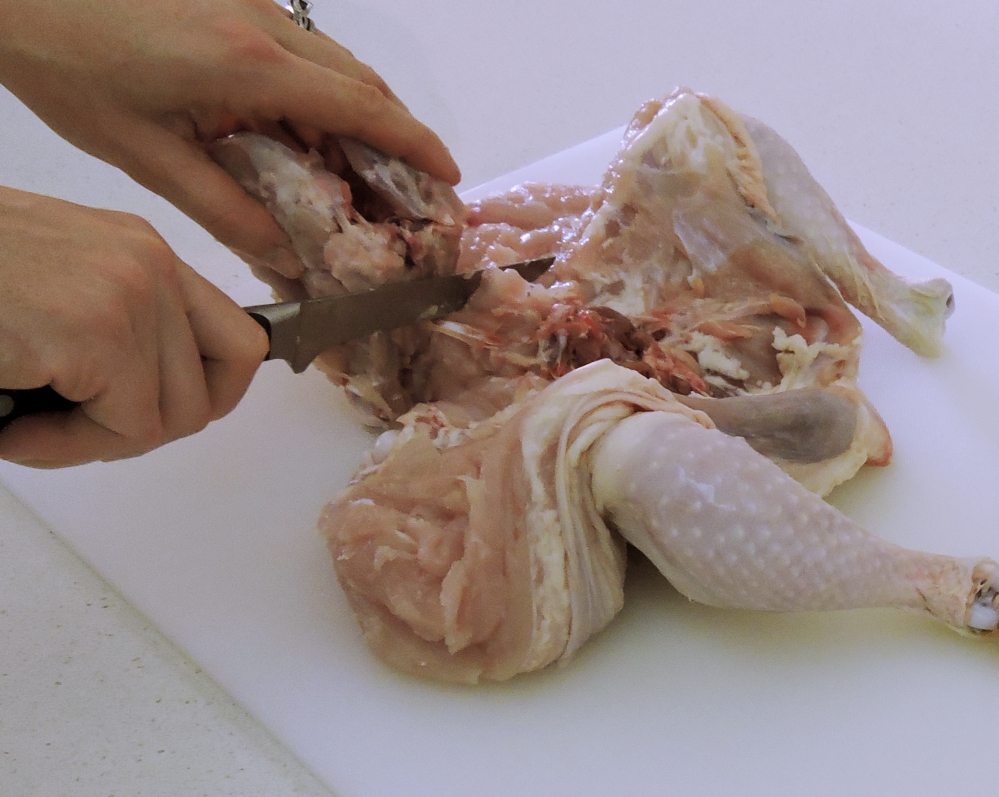
STEP THREE: Make a straight incision along the entire length of the breast bone.

STEP FOUR: Working gently and carefully, start to cut down one side of the breast bone, working your way around until the entire breast is cut away from the middle carcass. Do the same on the other side.

STEP FIVE: Once the breast has been cut away, gently remove the wishbone. Don’t worry too much if you’ve clumsily left a little bit of meat on the bones, because you can trim it off and just press it back into the chicken, no body will ever know!

STEP SIX: Now we want to remove the top half of the carcass. Using your hands, snap the spine between the chest and the butt section of your chook.
Now gently, and I mean gently, cut away the top half of the carcass by running your knife between the spine and skin. Take your time, a hole in this skin area will be reasonably catastrophic and hard to fix later - but not impossible, I have tricks 🙂

STEP SEVEN: It’s time to remove the wing bones. Run your knife around the top visible knob to cut away the tendons, then using your knife gently scrape the meat off downwards while holding the top of the bone.

Once the wing bone is clean, you will be able to pop it straight out of the hole made when you cut away the tip at the beginning. SAAAAAA EASY!

STEP EIGHT: Baby got back… At least for about 5 more minutes. It’s time for our chook to slim down that ass. Make an incision on the side of the butt bone by gently running your knife along it. Be REALLY CAREFUL, it’s mainly skin in this area and we really want to keep it intact. Take your time, there’s no rush.

Now using your hands, gently pop the leg bone out of its socket. Do it on the other side as well. This will allow you to cleanly cut away the butt bones.

Keep working super gently, and just slice, slice, slice away until your entire butt bone is off. Try to salvage as much skin as possible because it will make it easier to roll and tie later. Cut the bone away at the parsons nose (for the uninitiated, this is the chickens actual butt, or popes hat, or tail bone…or whatever).

Now, we don’t want that parsons nose. Cut it off. Poor little luv.

STEP NINE: We want to take out those leg bones now. Make an incision along the length of the thigh bone, then gently trim around the top of it to cut away the tendons.

Now holding the top of our little friends thigh bone, scrape the meat away in a downwards motion using the blade of your knife until the bone is clean.

Once the bone is clean, gently cut it away from the top of the drumstick bone and remove it completely. Do the same on the other side.


STEP TEN: We need to remove our very last bones, the drumsticks. Fold the chicken leg back over in its natural position with the thigh closed - see above pictures if you’re unsure what I mean.
Now, make an incision from the top of the thigh, right down to the base of the drumstick near where our girls foot used to be.

Using the same method as the other bones, cut away the tendons at the top and scrape downwards until the bone is clean. Then cut the bone away as close to her foot as possible.

After removing both of the drumstick bones. Carefully run your fingers all over your chooks flesh to make sure you haven’t left behind any inedible bone or cartilage. There will likely be a hard knob of cartilage where the drum and thigh bones met, very carefully cut it out making sure not to put a hole in the skin. I also like to gently cut away any large, unsightly tendons where the drumstick bone was as well.

OHHH EMMM GEEE!!! Just look at this little darling. She’s just perfectly prepped to roll and stuff. Maybe you want to use her for my ‘Churkey’ the recipe is HERE
You can now claim bragging rights for boning a chook, and quite honestly who wouldn’t be impressed with your handy poultry handywork?
Now, if the highly unfortunate event of a hole in the skin transpired during the operation, NEVER FEAR! There is still skin on those little chook wings over there. Gently cut the bones out of the wings by removing the tips, making an incision on the side and opening it up, then easing the bones out with your knife. You can now use the wing skin as a bandaid of sorts, keep it handy for when you’re tying the chook later and just tie it into place over any holes. It will fuse on while your little babe is roasting.
Enjoy! xxx
No comments yet, be the first to leave one!